POS Credit and Debit Notes - DTE Chile

This documentation is exclusively for companies operating under Chilean legislation and Electronic Invoicing.
Through this application it is possible to perform different actions on the DTEs issued in the Point of Sale module:
Register electronic boletas and invoices.
Assign credit notes / electronic debit notes.
Search for invoices, boletas, credit notes or electronic debit notes.
The initial screen shows the following sections:
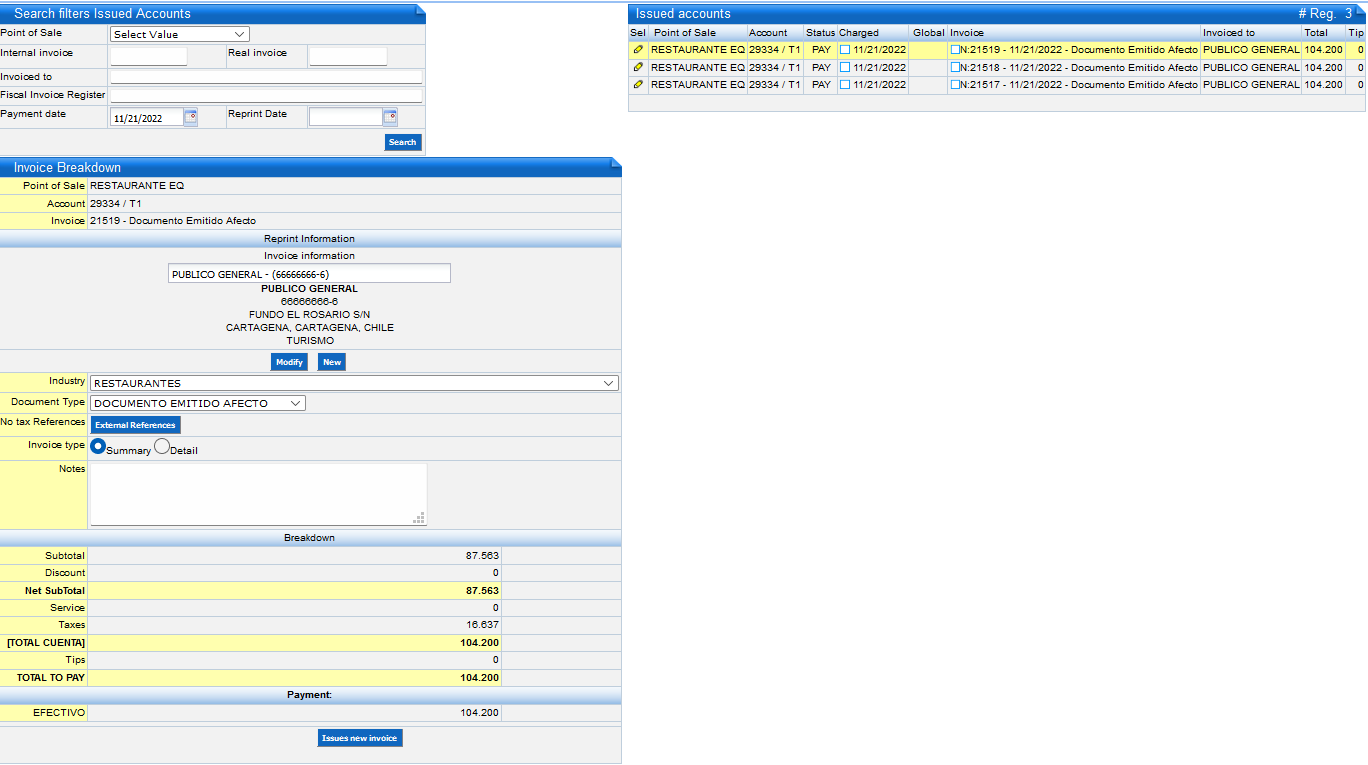
- Search filters of issued Accounts: Allows you to search for registered documents.
- Issued Accounts: Displays the day's accounts with the associated documents and their status. Displays the results of the searches performed.
Search for POS Accounts and/or DTE Documents
To search for an account or document follow the steps below:
Go to: POS F&B - Retail → Point of Sale → Reprint of Invoices
Register the information in the following fields:
Go to: POS F&B - Retail → Point of Sale → Reprint of Invoices
Register the information in the following fields:
Field | Description |
Internal Invoice | Invoice number initially issued. |
Invoiced To | Name of the company or natural person to whom the document was invoiced. |
Register Fiscal Invoice | RUT Number or Fiscal Code of Agency/Company. |
Change Date | Date on which the document was made. |
Click on the Search button.
The search will be performed with the data entered (they are not mandatory fields so you can proceed without completely filling all of the fields) and the information will be displayed in the Issued Accounts section.
Registration of DTE (Electronic Tax Documents)
The registration of Electronic Tax Documents at the Points of Sale is done at:
DTE | Touch Screen App | Reprint of Invoice App |
Electronic Invoice | Yes | Yes |
Electronic Boleta | Yes | Yes |
Electronic Credit Note | No | Yes |
Electronic Debit Note | No | Yes |
To assign an invoice to a Point-of-Sale account perform the following actions:
Go to: POS F&B - Retail → Points of Sale → Reprint of Invoice
Select the Charge Date with the Calendar icon in the Search Filters of Issued Accounts section. The default option is today's date.
Click on the Selection Pencil icon of the account for which you want to make the invoice in the Issued Accounts section.
In the Invoice Breakdown section enter the following fields:
Field | Description |
Invoice Data | If the customer is already registered the name will be displayed, click on it to accept. Choose one of the following buttons if:
|
Business Line | Select the appropriate one by clicking on it. Each business line has the corresponding tax documents. |
Document Type | Click on the type to be performed:
|
Reference Charges | Clicking on the External References button displays the External References section where the information required by the client is entered; this information will be displayed in the DTE. The information will be entered in the section Assign External References for Electronic Documents of the following fields:
In the Assign External References for Electronic Documents section will display already registered references. |
Invoice Type | Choose by clicking on:
|
Email | Enter the e-mail address to which the DTE files will be sent. |
Notes | Comments regarding the account are recorded. |
Click on the Generate New Invoice button.
A window will be displayed to confirm the printing with the message Do you want to Generate New Document?
Click on the Ok button to finish printing, showing the DTE in its graphical representation in PDF format.
Reprint of DTE (Electronic Tax Documents)
A window will be displayed to confirm the printing with the message Do you want to Generate New Document?
Click on the Ok button to finish printing, showing the DTE in its graphical representation in PDF format.
Reprint of DTE (Electronic Tax Documents)
To reprint a DTE associated with a POS account follow the steps below:
Go to: POS F&B - Retail → Points of Sale → Reprint of Invoice
Select the Charge Date with the Calendar icon in the Search filters of Issued Account section. The default option is today's date.
In the Issued Accounts section click on the Selection Pencil icon of the account for which you wish to perform the document query.
Depending on the requirement, download the appropriate file:
- PDF file: It will display the document in its graphical representation in PDF format which can be sent to print or save.
- XML file: It will show the window or options to download the document in XML format.
Debit/Credit Notes
In order to cancel the Electronic Tax Documents, a:
Document Issued | Document to Override |
Electronic Invoice | Electronic Credit Note |
Electronic Boleta | Electronic Credit Note |
Credit Note | Debit Note |
Debit Note | Credit Note |
The actions that can be performed for both Credit and Debit Notes are as follows:
Action | Description |
| Annul | It renders the DTE ineffective. |
Correct Text | Modifies text: Business, Address, Company Name, Notes. |
Correct Amount | Edit Imports. |
To assign a Credit Note or Debit Note to the DTE issued from the Points of Sale perform the following actions:
Go to: POS F&B - Retail → Points of Sale → Reprint of Invoice
Select the Charge Date with the Calendar icon in the Search filters of Issued Account section in the Charge Date field. The default option is today's date.
Click on the Selection Pencil icon of the account for which you want to make the invoice or slip in the Issued Accounts section.
In the Invoice Breakdown section enter the following fields:
Field | Description |
Invoice Data | If the customer is correct, it is left unchanged. If you need to correct it, choose one of the following buttons yes:
|
Document Type | Select the type of DTE to be performed:
|
Type of Reference for CN or DN | Select the action: Annul: This option renders the DTE ineffective. Click on the Save button. Correct Text:
Correct Amount:
|
Reference Charges | When clicking on the External References button, in case you need to modify or enter, the External References section is displayed, where you enter the information required by the client, which will be displayed in the DTE. Enter the information in the section Assign External References for Electronic Documents of the following fields:
In the Assign External References for Electronic Documents section will display already registered references. Click on the icon to modify the captured data. |
Invoice Type | Choose by clicking on:
|
Email | Enter the e-mail address to which the files will be sent. |
Notes | Comments regarding the account are recorded. |
Click on the Generate New Invoice.
A window will appear to confirm the printing with the message Do you want to Generate New Document?
Click on the Ok button to finish printing, showing the DTE in its graphical representation in PDF format.
Related Articles
POS CFDi Credit Note - Mexico - Reprint of Invoices
To issue Credit Notes to a CFDI to correct the amount or partial amount of the CFDI made at the Points of Sales, perform the following steps. Go to: Points of Sales → Reprintiof Invoices Search for the electronic document to which the Credit Note ...POS Dispatch Guides - DTE 52 Chile
The Dispatch Guide can only be issued in the Reprint of Invoice option of the Front Office or POS. For the types of Dispatch Guides, see SII Code Reference for DTE issued from Novohit. To issue a Dispatch Guide from POS (Point of Sale) you must first ...POS Touch Screen
Open the POS Touch Point of Sales Application To access the application, go to POS F&B and Retail (Food & Beverages) → Point of Sale → POS Touch Screen or by opening a shortcut icon on the desktop or main screen of the tablet. Ask your system ...Electronic Invoicing - POS Touch Screen
Procedure to Issue Electronic Invoice or Boleta from the Point of Sale Once the account is paid, it can be invoiced immediately. Or, if the pos_master.is_show_invoice_after_pay parameter is not active: click on the Paid Accounts button. Select the ...How to Generate DTE in the POS
To generate a DTE in the POS, once the account has been created, you must click on the account tab. A new section will be opened, click on print. The next step will give us the account transaction option. Select the form of payment and press the pay ...