Tartel Windows Configurations Manual
Operation
To start the pricing call, just double click on the pricing icon and the main screen will be displayed.
As you will see, at the top of the screen you will see our menu to access the different options of the Tarificador, when you select any of these options the system will show you a submenu to go to the desired option.
Another way to get directly to the different utilities of the system is by clicking on the icon that identifies the desired option, below the icons shows a box in which the last ten calls charged will appear. Lastly, the lower box will be used by the Tarificador to send us alert messages, show us the last record received from the PBX, and in a smaller window it will show us which person is signed and their level.
The first thing to do is to login by clicking on the login icon, the following window will appear.
The first thing to do is to login by clicking on the login icon, the following window will appear.
If the password is correct, the system will give access to the different menu options depending on the level assigned.
Next, we will show each of the options in the different menus and how to use them.File Maintenance
Configuration
Utilities
Next, we will show each of the options in the different menus and how to use them.
File Maintenance
In this menu we will be able to add, change or delete the records that compose the different databases of the system.
- Extensions
- Areas
- Main
- Long Distance Codes
- Telephone Rates
- Telephone Directory
- Authorization Codes
- Passwords
- Wake-Up Calls
Configuration
With these other menus the system will allow us to configure some parameters necessary for the operation of Tartel, such as the costs that we want to charge to the guests, as well as the VAT, etc.
- Minimum Times
- Charges for Extensions
- Taxes
- Folios
- Special Rates
- Printing Charges
Utilities
In these menus the System will allow us to use the different utilities that the Tarificador has, such as:
- Exchange Rate
- Messages
- Manual Charges
- Routing
- Cancel/Reprint Charges
- Interface to Front
- Backup and Queries
Inquiries
This menu allows us to consult the information contained in the following databases:
- Extensions
- Dialing Codes
- Telephone Directory
- Pending Routing
Reports
- Detailed by Extensions
- Summarized by Extensions
- Summarized by Departmental Areas
- By Geographic Areas
- Detailed by Cities
- Summarized by Cities
- Night Audit
- Daily Revenues
- Most Marked Numbers
- Hourly Traffic
- Financial
- Reconciliator
- Detailed by Codes
- Summarized by Codes
- Detailed by Trunks
- Summarized by Trunks
- Summarized by Call Type
- Accumulated Report
Finally, we have the exit icon, which will allow us to exit the scheduler as long as a user with an administrator level is registered, otherwise we will not have access to this icon.
Maintenance
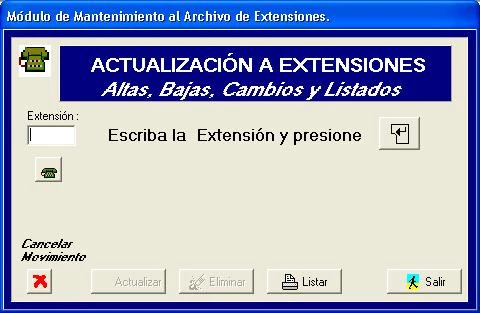
To access this module, click on the icon on the main screen and the system will display the following window.
Maintenance
- Extensions
To access this module, click on the icon on the main screen and the system will display the following window.
Fields:
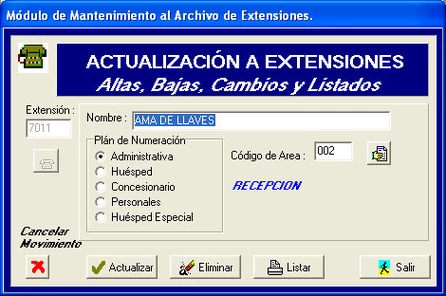
Extension: You must type here the extension number to register, change information or cancel. This field is required in order to continue. If you wish to consult the existing extensions, click on the icon  to consult them.
Name: Here you will enter the name of the person in charge of the extension or the name of the department where it is located, if the extension is administrative it is recommended to fill this field.
Numbering Plan: You must select a letter that indicates the type of rate you want for this extension. By default it will select the letter A for Administrative.
Area Code: It is important to type an area code, which will allow you to group your extensions by cost centers, being able to request reports of them, to choose an area code you can use the icon that will allow you to see and select the corresponding area.
Extension to Post: In the case of calls that are sent to the Front System of the hotel, it is possible to indicate to the Tariff System through this field, that you want to charge the call to a different extension than the one that originated it, as would be the case of rooms that have two extensions with different numbers.
Name: Here you will enter the name of the person in charge of the extension or the name of the department where it is located, if the extension is administrative it is recommended to fill this field.
Numbering Plan: You must select a letter that indicates the type of rate you want for this extension. By default it will select the letter A for Administrative.
Area Code: It is important to type an area code, which will allow you to group your extensions by cost centers, being able to request reports of them, to choose an area code you can use the icon
Extension to Post: In the case of calls that are sent to the Front System of the hotel, it is possible to indicate to the Tariff System through this field, that you want to charge the call to a different extension than the one that originated it, as would be the case of rooms that have two extensions with different numbers.
The first thing to do is to type the extension number and press <ENTER>, if the extension exists, the system will fill the fields with the extension information, if it is a newly created extension, the system will indicate that it is newly created and will allow you to fill the missing fields with the corresponding information.
Once the fields are filled in, click on the Update field to save the extension information, or click on the Delete icon to delete the extension, or click on the Cancel
  icon to cancel the movement of the extension.
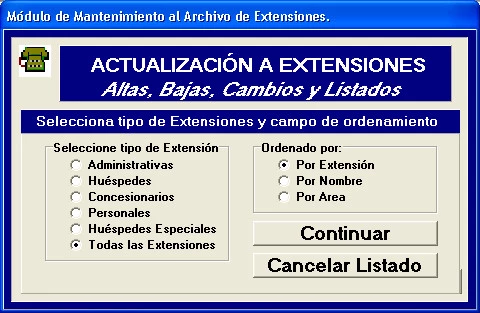
To generate a list of your extensions, click on the list icon and the system will display the following window.
Once the fields are filled in, click on the Update field to save the extension information, or click on the Delete
To generate a list of your extensions, click on the list icon and the system will display the following window.
First, select the type of extensions for which you want your listing, Administrative, Guest, Personal, etc. And then the order of the same ones, this can be by extension, by name or by area, once this is done, click on continue to obtain your listing or click on Cancel Listing to return to the previous screen.
If you selected continue, the system will display the requested listing, if we want to search in our listing some special information, just click on the search icon, and the system will display a window where we must type the text we want to find in the listing, once typed, select search next, if the system finds the requested text, it will indicate where it is, if you want the system to search if there is more information, press again the search next key, if the system does not find more information, it will indicate it to you.
We can also send our list to a file or send it to print, to do this select the icon that corresponds to your requirement.
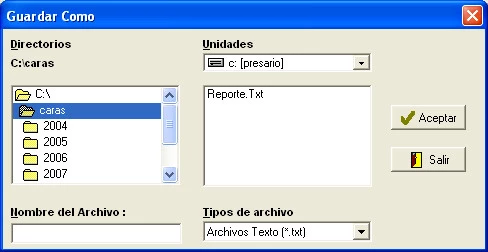
If you selected send to file, the system will open a window for you to indicate the name you want to give to the list and the place where you want it to be saved, this can be in a subdirectory of your hard disk or in some other backup drive.
Areas
To enter this module, click on the icon
Fields:
Area Code: Here we will type in a sequential number that will identify the area to be registered or modified, we have three digits for this purpose.
Area Name: Enter the name you wish to give to this Area code.Budget: Here we can enter the budget allocated to this area for telephone calls.
Type in the area number you wish to register, change or delete information and then press <Enter>, if you wish to consult the existing area codes, click on the icon  to see which ones are available, if you find the code number you wish to change or delete, select it and double click to fill in the fields with the corresponding information.
Once on screen the information contained in this area code, you can change the fields you want, then select the icon that indicates the movement you want to make,  delete, to delete the code;
  Update to save the typed information, the icon
  to cancel the changes, the icon to
  exit, if you want to return to the previous menu or if you want to get a list of your area codes select the icon
 .
.
To generate a list of your area codes, click on the List  icon and the system will display the following window.
Select the order by which you wish to view your listing, this can be by name or by Area Code number, once this is done, click on continue to obtain your listing or click on Cancel Listing to return to the previous screen.
If you selected continue, the system will display the requested listing, if we want to search in our listing some special information, just click on the search icon, and the system will show us a window where we must type the text we want to find in the listing, once typed, select search next, if the system finds the requested text, it will indicate where it is, if you want the system to search if there is more information, press again the search next key, if the system does not find more information, it will indicate it.
We can also send our list to a file or send it to print, to do this select the icon that corresponds to your requirement.
If you selected send to file, the system will open a window for you to indicate the name you want to give to the list and the place where you want it to be saved.
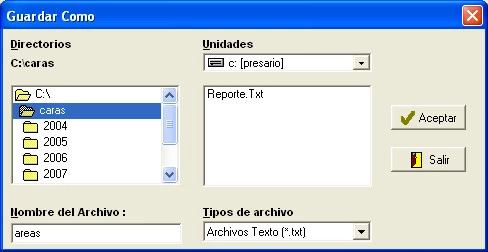
Once you have saved your listing, click on the exit icon to return to the previous window.
Main
This module will create a database containing for each respective main telephone number, this information will be used in the conciliator report, in which it will replace the number through the main call went out by the corresponding telephone number.
To access this module, click on the icon  and the system will present the following window:
Fields:
Main: Here you must enter the Main number as sent by your PBX.
Telephone Number: type in the telephone number assigned for this trunk.
Telephone Company Number: Select number 1 for Telmex or 2 depending on who provides your telephone service.
Company Name: Type the full name of the telephone company that provides the service.The first thing the system will ask for is the trunk number, which you wish to add, change or delete, and then press <Enter>.
If the trunk is new, the system will inform you and ask you to fill in the corresponding fields.
If you work with two telephone companies here you must tell the system which trunks each company has, by default the company is Telmex.
If you work with two telephone companies here you must tell the system which trunks each company has, by default the company is Telmex.
If you wish to consult the existing trunks in your database press the icon so that the system displays them, if you find the trunk you wish to change information or delete, select it and double click on it, and the fields will be filled with the corresponding information, if you wish to change information do so and then click on the update icon, to save the information; if you wish to delete it, click on the delete
  icon.
icon.
To generate a list of your trunks, click on the report icon and the system will display the following window.
To generate a list of your trunks, click on the report icon and the system will display the following window.
If you selected continue, the system will display the requested listing, if we want to search in our listing some special information, just click on the search icon, and the system will display a window where we must type the text we want to find in the listing, once typed, select search next, if the system finds the requested text, it will indicate where it is, if you want the system to search if there is more information, press again the search next key, if the system does not find more information, it will indicate it.
We can also send our list to a file or send it to print, to do this select the icon that corresponds to your requirement.
If you selected send to file, the system will open a window for you to indicate the name you want to give to the list and the place where you want it to be saved.
Once finished, select the exit  icon to return to the previous menu, then the cancel icon and finally click again on the exit
  icon to return to the main screen of the Scheduler and continue pricing your calls.
Long Distance Codes
Through this module you will be able to register, modify or cancel access codes to L.D., to access this module click on the icon  Long Distance Codes Module, the system will show you the corresponding window and will ask you to type a Login and a Supervisor level Password and then it will show you the following window:
Fields:
L.D. Code: This field should be filled in by the L.D. Code number you wish to add, change information or delete, the key should be typed with its respective access code, 01 National, 001 USA and Canada or 00 Rest of World, (e.g. Mexico City type 0155).
City: Type the name of the City, State or Country that corresponds to this password, this name will appear in your call reports.
Basic Rate: Type here the basic rate at which you want the calls of this code to be charged.
The first thing to do is to type the Key you want to process, if it is a new key type the complete number and then click on the box and the system will show you the fields to fill in.
If it is a modification or cancellation you can use the icon L.D. Key Query to select the desired key, double click on it and the System will fill the fields with the existing information, if you want to change the name of the City, select the corresponding field and type the new name, if the change refers to the basic rate, you can click on the icon
  to consult the existing rates, select the one you want to use for this key and double click to take this selection.
Once you have filled in the fields, click on the icon that fulfills what you want to do: Cancel movement,
  Update or
  Delete.
To generate a list of the existing Access Keys, click on the report icon and the system will display the following window.
City: Type the name of the City, State or Country that corresponds to this password, this name will appear in your call reports.
Basic Rate: Type here the basic rate at which you want the calls of this code to be charged.
The first thing to do is to type the Key you want to process, if it is a new key type the complete number and then click on the box and the system will show you the fields to fill in.
If it is a modification or cancellation you can use the icon
Once you have filled in the fields, click on the icon that fulfills what you want to do:
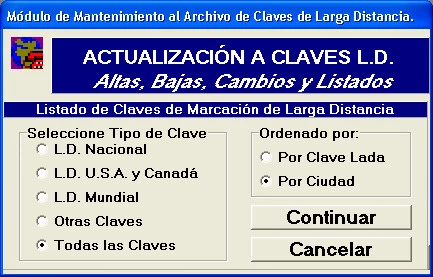
To generate a list of the existing Access Keys, click on the report icon and the system will display the following window.
Select the List of Keys you want, National, USA and Canada, World, Xcobrar or All the existing ones, finally select the order by which you want to see your list, this can be by Key number or by City name, once this is done, click on continue to obtain your list or click on Cancel List to return to the previous screen.
If you selected continue, the system will display the requested listing, if we want to search in our listing some special information, just click on the search icon, and the system will display a window where we must type the text we want to find in the listing, once typed, select search next, if the system finds the requested text, it will indicate where it is, if you want the system to search if there is more information, press again the search next key, if the system does not find more information, it will indicate it to you.
We can also send our list to a file or send it to print, to do this select the icon that corresponds to your requirement.
If you selected send to file, the system will open a window for you to indicate the name you want to give to the list and the place where you want it to be saved.
Once finished, select the exit  icon to return to the previous menu, then the cancel
  icon and finally click again on the exit icon to return to the main screen of the Scheduler and continue pricing your calls.
Basic Rates
Through this module you will be able to register, modify or cancel the basic rates, to access this module click on the icon  Basic Telephone Rates Module, before showing the corresponding window the system will ask you to type a Login and a Supervisor level Password and then it will show you the following window:
Fields:
Basic Rate: This field must be filled in by the number of the Basic Tariff you wish to register, change information or cancel.
Geographic Region: Type the name of the Region or City that corresponds to that Rate.
Cost to Cap: Type the cost you pay to your Telephone Company for calls to this Geographic Region.
Cap: Type here the maximum minute you want to charge the cost you typed above.
Additional Cost: Type here the additional cost you want to charge for the minutes over the maximum minute.
Add M.S.: If you wish to add Metered Service to the cost, click in this box.
The fields for IP Cost are the same and these are the costs of a second telephone company.
The first thing you will need to do is type in the Basic Rate you wish to process, if it is a new Rate type in the complete number and then click on the box <enter> and the System will show you the fields to fill in.
If it is a modification or cancellation you can use the icon Basic Rates Query to select the desired rate, double click on it and the system will fill the fields with the existing information, if you want to change the name of the Geographic region, select the corresponding field and type the new name, type the cost of the rate and finally select the option that corresponds to the way you are charged for this type of rate.
Once the fields are filled in, click on the icon that fulfills what you want to do: Cancel movement , Update
  or Delete
 .
.
To generate a list of the existing Basic Rates, click on the List icon and the system will display the following window.
Geographic Region: Type the name of the Region or City that corresponds to that Rate.
Cost to Cap: Type the cost you pay to your Telephone Company for calls to this Geographic Region.
Cap: Type here the maximum minute you want to charge the cost you typed above.
Additional Cost: Type here the additional cost you want to charge for the minutes over the maximum minute.
Add M.S.: If you wish to add Metered Service to the cost, click in this box.
The fields for IP Cost are the same and these are the costs of a second telephone company.
The first thing you will need to do is type in the Basic Rate you wish to process, if it is a new Rate type in the complete number and then click on the box <enter> and the System will show you the fields to fill in.
If it is a modification or cancellation you can use the icon
Once the fields are filled in, click on the icon that fulfills what you want to do: Cancel movement
To generate a list of the existing Basic Rates, click on the List icon and the system will display the following window.
Select the order by which you want to see your listing, this can be by Basic rate number or by name of the Geographic Region, once you have done this, click on continue to obtain your listing or click on Cancel Listing to return to the previous screen.
If you selected continue, the system will display the requested listing, if we want to search in our listing some special information, just click on the search icon, and the system will display a window where we must type the text we want to find in the listing, once typed, select search next, if the system finds the requested text, it will indicate where it is, if you want the system to search if there is more information, press again the search next key, if the system does not find more information, it will indicate it to you.
We can also send our list to a file or send it to print, to do this select the icon that corresponds to your requirement.
If you selected send to file, the system will open a window for you to indicate the name you want to give to the list and the place where you want it to be saved.
Once you are done, select the exit icon to return to the previous menu, then the cancel icon
  and finally click again on the exit icon to return to the main screen of the Scheduler and continue pricing your calls.
Telephone Directory
If you selected continue, the system will display the requested listing, if we want to search in our listing some special information, just click on the search icon, and the system will display a window where we must type the text we want to find in the listing, once typed, select search next, if the system finds the requested text, it will indicate where it is, if you want the system to search if there is more information, press again the search next key, if the system does not find more information, it will indicate it to you.
We can also send our list to a file or send it to print, to do this select the icon that corresponds to your requirement.
If you selected send to file, the system will open a window for you to indicate the name you want to give to the list and the place where you want it to be saved.
Once you are done, select the exit icon
Telephone Directory
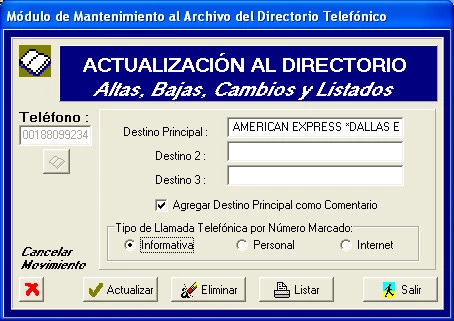
Through this module you will be able to create a Telephone Directory with the most common numbers of Hotels, Travel Agencies, Restaurants etc. So that you can consult them in a fast way or obtain a list of them, also through this module we can type personal or Internet numbers, that is to say, we can include in our telephone directory, numbers that the Hotel staff uses to make personal calls and then be charged by the hotel or Internet numbers to be charged with a special cost, to access this module click on the icon  Module of Additions, Deletions and Changes to the Telephone Directory, the System will show you the following window:
Fields:
Telephone: This field should be filled in with the number we wish to add, modify or remove from our Telephone Directory.
Destination: Type here the name of the company to which the number belongs; or if it is a personal number, the name of the person responsible for it; if it is an Internet number, the name of the Internet company.
Destination2: If the same telephone number is shared by a second company, we can type the name here.
Destination3: Likewise if there is a third company sharing the same phone number.
Add Primary Destination in comment: If you want the name to appear in the reports in the comment column click on the checkbox.
Type of Telephone Call per Dialed Number:
Informational: Select this type if the number is from a supplier or customer.
Personal: Select this type if this number is required to be taken as a personal call.
Internet: Select this type if this number is for Internet call pricing.
The first thing to do is to type the phone number you want to process, if it is a new number type the complete number and then click on the box <enter> and the system will show you the fields to fill in.
If it is a modification or cancellation you can use the Telephone Directory Query icon to select the desired number, double click on it and the system will fill the fields with the existing information, if you want to change the name of the destination, select the corresponding field and type the new name, select the type of treatment you want to give to the number, according to your needs.
Once you have filled in the fields, click on the icon that fulfills what you want to do: Cancel movement,
  Update or
  Delete.
To generate a list of the Telephone Directory, click on the List icon and the system will display the following window.
Select the order by which you want to view your listing, this can be by phone number, by destination or by type of number dialed, once done, click continue to get your listing or click Cancel Listing to return to the previous screen.
Destination: Type here the name of the company to which the number belongs; or if it is a personal number, the name of the person responsible for it; if it is an Internet number, the name of the Internet company.
Destination2: If the same telephone number is shared by a second company, we can type the name here.
Destination3: Likewise if there is a third company sharing the same phone number.
Add Primary Destination in comment: If you want the name to appear in the reports in the comment column click on the checkbox.
Type of Telephone Call per Dialed Number:
Informational: Select this type if the number is from a supplier or customer.
Personal: Select this type if this number is required to be taken as a personal call.
Internet: Select this type if this number is for Internet call pricing.
The first thing to do is to type the phone number you want to process, if it is a new number type the complete number and then click on the box <enter> and the system will show you the fields to fill in.
If it is a modification or cancellation you can use the Telephone Directory Query icon
Once you have filled in the fields, click on the icon that fulfills what you want to do:
To generate a list of the Telephone Directory, click on the List icon and the system will display the following window.
Select the order by which you want to view your listing, this can be by phone number, by destination or by type of number dialed, once done, click continue to get your listing or click Cancel Listing to return to the previous screen.
If you selected continue, the system will display the requested list, if we want to search in our list some special information, just click on the search icon, and the system will display a window where we must type the text we want to find in the list, once typed, select search next, if the system finds the requested text, it will indicate where it is, if you want the system to search if there is more information, press again the search next key, if the system does not find more information, it will indicate it.
We can also send our list to a file or send it to print, to do this select the icon that corresponds to your requirement.
If you selected send to file, the system will open a window for you to indicate the name you want to give to the list and the place where you want it to be saved.
Once you are done, select the exit icon to return to the previous menu, then the cancel icon
  and finally click again on the exit icon to return to the main screen of the Scheduler and continue pricing your calls.
Authorization Codes
We can also send our list to a file or send it to print, to do this select the icon that corresponds to your requirement.
If you selected send to file, the system will open a window for you to indicate the name you want to give to the list and the place where you want it to be saved.
Once you are done, select the exit icon
Authorization Codes
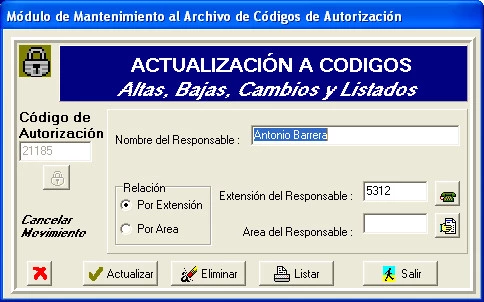
Through this module you will be able to register, modify or cancel the authorization codes used by your executives to make phone calls, to access this module click on the Authorization Codes Maintenance Module  icon, the system will display the following window:
Fields:
Authorization Code: Type the authorization code number.
Name: This field should be filled in by the name of the person responsible for this authorization code.
Relation:
By Extension Select this option if you want your calls to be charged to the extension of the responsible party.
By Area Select this option if you want the calls of this code to be charged to the area to which it belongs.
Extension: Type here the extension number where the calls will be charged.
Area: Type the area number where you want the call to be charged to.
The first thing to do is to type the number of the Authorization code you want to process, if it is a new code type it and then click on the box <enter> and the system will show you the fields to fill in.
If it is a modification or cancellation you can use the icon Authorization Code Query, to select the desired code, if you find it double click on it and the system will fill the fields with the existing information, if you want to change the name of the responsible, select the corresponding field and type the new name, if you want to change the extension number of the responsible in the same way select the corresponding field, type the new extension number.
Once the fields are filled in, click on the icon that fulfills what you want to do: Cancel movement , Update
  or Delete
  .
.
To generate a list of the Authorization Codes, click on the List icon and the system will display the following window.
Name: This field should be filled in by the name of the person responsible for this authorization code.
Relation:
By Extension Select this option if you want your calls to be charged to the extension of the responsible party.
By Area Select this option if you want the calls of this code to be charged to the area to which it belongs.
Extension: Type here the extension number where the calls will be charged.
Area: Type the area number where you want the call to be charged to.
The first thing to do is to type the number of the Authorization code you want to process, if it is a new code type it and then click on the box <enter> and the system will show you the fields to fill in.
If it is a modification or cancellation you can use the icon
Once the fields are filled in, click on the icon that fulfills what you want to do: Cancel movement
To generate a list of the Authorization Codes, click on the List icon and the system will display the following window.
Select the order by which you want to see your listing, this can be by code number, by name of the responsible or by extension number of the responsible, once this is done, click on continue to obtain your listing or click on Cancel Listing to return to the previous screen.
If you selected continue, the system will display the requested listing, if we want to search in our listing some special information, just click on the search icon, and the system will display a window where we must type the text we want to find in the listing, once typed, select search next, if the system finds the requested text, it will indicate where it is, if you want the system to search if there is more information, press again the search next key, if the system does not find more information, it will indicate it to you.
We can also send our list to a file or send it to print, to do this select the icon that corresponds to your requirement.
If you selected send to file, the system will open a window for you to indicate the name you want to give to the list and the place where you want it to be saved.
Once you are done, select the exit icon to return to the previous menu, then the cancel icon and finally click again on the exit icon
  to return to the main screen of the Scheduler and continue pricing your calls.
Password Maintenance
If you selected continue, the system will display the requested listing, if we want to search in our listing some special information, just click on the search icon, and the system will display a window where we must type the text we want to find in the listing, once typed, select search next, if the system finds the requested text, it will indicate where it is, if you want the system to search if there is more information, press again the search next key, if the system does not find more information, it will indicate it to you.
We can also send our list to a file or send it to print, to do this select the icon that corresponds to your requirement.
If you selected send to file, the system will open a window for you to indicate the name you want to give to the list and the place where you want it to be saved.
Once you are done, select the exit icon to return to the previous menu, then the cancel icon
Password Maintenance
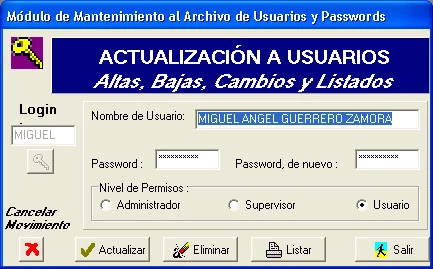
Through this module you will be able to register, modify or delete the passwords you use in the system, to access this module click on the icon Password Maintenance  Module, if you are signed in as administrator, you will have access to this module, otherwise the access will be denied, if you are authorized the system will show the following window:
Fields:
Login: This field should be filled with the login you wish to register, change information or unsubscribe.
User Name: Type the full name of the person who will use this Password.
Password: Type the password that this person will use.
Confirm Password: Type the same password again to confirm.
Permission Level: Choose the level you want to give to this Password.
The first thing to do is to type the Login that you will assign to the person, if it is a new Login and then click on the box <enter> and the System will show you the fields to fill in.
If it is a modification or cancellation you can use the icon query User Login, to select the desired login, double click on it and the system will fill the fields with the existing information, if you want to change the name of the person responsible for the password, select the corresponding field and type the new name and then or click on the next field to fill, type the Password that will be assigned and then type it in the next field, to verify that the same was written, finally select the level that will be assigned to this password.
Once you have filled in the fields, click on the icon that meets your needs: Cancel , Update
  or Delete
  .
.
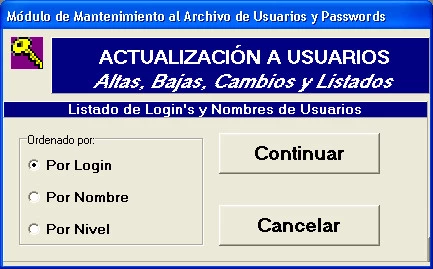
To generate a list of existing passwords, click on the List icon and the system will display the following window.
User Name: Type the full name of the person who will use this Password.
Password: Type the password that this person will use.
Confirm Password: Type the same password again to confirm.
Permission Level: Choose the level you want to give to this Password.
The first thing to do is to type the Login that you will assign to the person, if it is a new Login and then click on the box <enter> and the System will show you the fields to fill in.
If it is a modification or cancellation you can use the icon
Once you have filled in the fields, click on the icon that meets your needs: Cancel
To generate a list of existing passwords, click on the List icon and the system will display the following window.
Select the order by which you want to see your listing, this can be by login, by user name or by assigned levels, once this is done, click on continue to get your listing or click on Cancel Listing to return to the previous screen.
If you selected continue, the system will show on screen the requested listing, if we want to search in our listing some special information, just click on the search icon, and the system will show a window where we must type the text we want to find in the listing, once typed, select search next, if the system finds the requested text, it will indicate where it is, if you want the system to search if there is more information, press again the search next key, if the system does not find more information, it will indicate it to you.
We can also send our list to a file or send it to print, to do this select the icon that corresponds to your requirement.
If you selected send to file, the system will open a window for you to indicate the name you want to give to the list and the place where you want it to be saved.
Once you are done, select the exit icon to return to the previous menu, then the cancel icon and finally click again on the exit
 icon to return to the main screen of the Scheduler and continue pricing your calls.
If you selected continue, the system will show on screen the requested listing, if we want to search in our listing some special information, just click on the search icon, and the system will show a window where we must type the text we want to find in the listing, once typed, select search next, if the system finds the requested text, it will indicate where it is, if you want the system to search if there is more information, press again the search next key, if the system does not find more information, it will indicate it to you.
We can also send our list to a file or send it to print, to do this select the icon that corresponds to your requirement.
If you selected send to file, the system will open a window for you to indicate the name you want to give to the list and the place where you want it to be saved.
Once you are done, select the exit icon to return to the previous menu, then the cancel
Wake-Up Calls
Through this module you will be able to register, modify or cancel the wake up calls requested by the guests, to access this module click on the icon Wake Up Calls  Module, the system will show the following window:
Fields:
Time: This field should be filled in by the time you wish to be notified that there is a wake up for a Guest.
Ext/Room: Type here the extension or room number of the Guest to be awakened.
Guest Name: Fill this field with the Guest's name.
The first thing to do is to type in the time you need to wake up the Guest and then press <enter> , type in the Guest's room number, and finally the Guest's name, if you want to know what wake up calls you have scheduled, click on the icon  and the system will open a window showing you the pending wake up calls.
If it is a modification or cancellation, select the corresponding field and type the information.
Once the fields are filled in, click on the icon that fulfills what you want to do: Cancel  , Update
  or Delete
  .
.
To generate a list of the Awakenings, click on the List icon and the system will display the following window.
Select the order by which you want to view your listing, this can be by room number or by the scheduled wake up time, once done, click on continue to get your listing or click on Cancel Listing to return to the previous screen.
If you selected continue, the system will show on screen the requested listing, if we want to search in our listing some special information, just click on the search icon, and the system will show us a window where we must type the text we want to find in the listing, once typed, select search next, if the system finds the requested text, it will indicate where it is, if you want the system to search if there is more information, press again the search next key, if the system does not find more information, it will indicate it to you.
We can also send our list to a file or send it to print, to do this select the icon that corresponds to your requirement.
If you selected send to file, the system will open a window for you to indicate the name you want to give to the list and the place where you want it to be saved.
Once you are done, select the exit icon to return to the previous menu, then the cancel icon and finally click again on the exit icon
  to return to the main screen of the Scheduler and continue pricing your calls.
Configuration
Minimum Times for Pricing
If you selected continue, the system will show on screen the requested listing, if we want to search in our listing some special information, just click on the search icon, and the system will show us a window where we must type the text we want to find in the listing, once typed, select search next, if the system finds the requested text, it will indicate where it is, if you want the system to search if there is more information, press again the search next key, if the system does not find more information, it will indicate it to you.
We can also send our list to a file or send it to print, to do this select the icon that corresponds to your requirement.
If you selected send to file, the system will open a window for you to indicate the name you want to give to the list and the place where you want it to be saved.
Once you are done, select the exit icon to return to the previous menu, then the cancel icon
Configuration
Minimum Times for Pricing
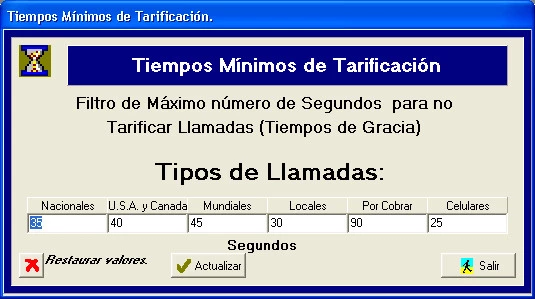
This option within the dialer will help us to set a time in seconds considered as dialing time, for those hotels that do not have the Polarity Inversion or Answer Supervision (A/A) service, which is provided by your telephone company, that is, the responsibility of determining which calls were answered and which were not, In this way, the PBX only sends to the dialer records of answered calls, when this does not exist, you can give the dialer a certain number of seconds to consider it as dialing time, if it exceeds this number of seconds, it rates the call, if it does not, it does not rate it.
The system allows you to program a minimum time per call type, National LD, LD to USA and Canada, LD to the rest of the world, Local, XCobrar and Cellular.
When you select this option, the system will present the following window:
As you can see, the system presents you with the different times you have for each type of marking, click on the window of the time you want to change and then click on  Update to save the changes or
  Restore Values, to return to the values you had before changing them or the
  exit icon, to return to the main menu.
Charges and Services According to Numbering Plan
This option will allow programming the costs we want to charge for each type of call depending if it is a Guest, Special Guests, Concessionaires or Personal calls, to enter this option click on the icon  Charges and Services according to Numbering Plan, the System will present the following window.
Fields:
Plan According to Rate Type: select the letter that identifies the rate type you wish to modify.
Rate: Identifies the basic tariff that corresponds to the geographic region.
Geographic Region: Name that identifies the geographic region to which you are marking.
Add Cost: This field indicates whether the cost of the call is added to the total cost of the call or if it is already included.
Total: This field shows the total amount being charged per call including S.M., hotel service and VAT.
Cap: Number of minutes up to which we want to charge the total of the call.
Additional Total: This field indicates the total that will be charged from the next minute indicated in the Cap field.
Select the type of rate you want to consult or modify, then double click on the rate to be modified and its data will be displayed on screen, you can only change the total of the same, the system will recalculate the service and VAT depending on the total that you type, click on Update to save the changes or
  Cancel Movement, to clear the fields again and select another rate, you can select and change as many rates as you want, when you have no more updates select the icon
  exit, to return to the main menu.
Example 1:
Example 2:
Percentage Tax (VAT)
Folio Numbering
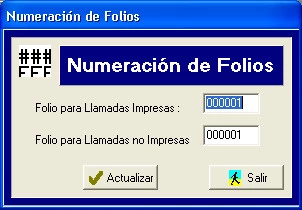
This option will allow us to modify the folio numbers that will correspond to the following calls that will be charged, we have two folio numbers, one is for the calls that are printed and the other for those that are not printed, this number is sequential and is given by the system as the calls go out.
To enter this module click on the Folio Numbering icon and with your mouse click on the field you wish to modify, once you have typed the correct number, click on the Update
  icon to save the changes or the Exit
  icon to return to the main menu.
Special Rates
Cost per-Block of Minutes: Type here the cost per-block of minutes for Internet calls.
Hourly Rate: If selected, the system will make discounts according to the time of the call, this is only for reports, in no way the nightly discounts are passed on to the Guest.
Metered Service: Enter the cost that your telephone company charges per connection (Metered Service).
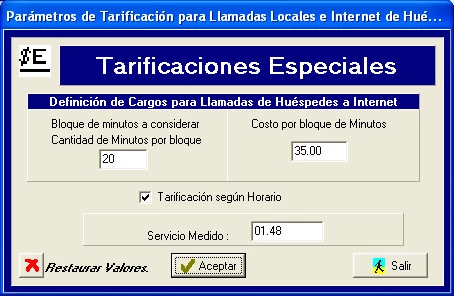
We can charge the Internet calls by blocks of minutes, to do this, click on the Block of Minutes for Internet Calls field and type here the amount of minutes you want to charge per-block, then select the next field to type the cost for each block of Internet calls.
Finally, if the rates charged by the telephone company to the hotel are discounted according to the time you call, click on the box before the Long Distance is charged according to time, otherwise, if you have a single rate, leave this box blank. It is clarified that this discount is not taken to the Guests, it is only used for reporting purposes, so that the actual rate charged by the telephone company is included in the reports.
Once you have finished your programming click on Update to save the changes or
  Cancel Movement, if you do not want to change anything, select the exit
  icon to return to the main menu.
Print Selection
Rate: Identifies the basic tariff that corresponds to the geographic region.
Geographic Region: Name that identifies the geographic region to which you are marking.
Add Cost: This field indicates whether the cost of the call is added to the total cost of the call or if it is already included.
Total: This field shows the total amount being charged per call including S.M., hotel service and VAT.
Cap: Number of minutes up to which we want to charge the total of the call.
Additional Total: This field indicates the total that will be charged from the next minute indicated in the Cap field.
Select the type of rate you want to consult or modify, then double click on the rate to be modified and its data will be displayed on screen, you can only change the total of the same, the system will recalculate the service and VAT depending on the total that you type, click on
Example 1:
If we wish to charge for the first 3 minutes a total of $15.00 and then after the 4th minute charge $10.00, we must type the following in the corresponding fields:
Total | Stop | Additional Total |
15.00 | 3 | 10.00 |
Example 2:
If we wish to charge $20.00 as a lump sum per call regardless of duration we would type:
Total | Stop | Additional Total |
20.00 | 1 | 0.00 |
The add cost box would only be used for those cases in which you want to add the cost of the call to the total typed and not included in it.
If we want to obtain a list of what is charged for the basic rate, we click on the print total charge icon, which will give us a list of what is being charged for each minute in the first 11 minutes of the call, this list can be printed or sent to a file.
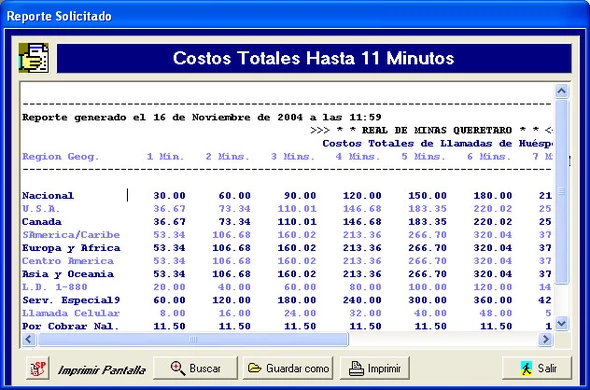
If we want to obtain a list of what is charged for the basic rate, we click on the print total charge icon, which will give us a list of what is being charged for each minute in the first 11 minutes of the call, this list can be printed or sent to a file.
Percentage Tax (VAT)
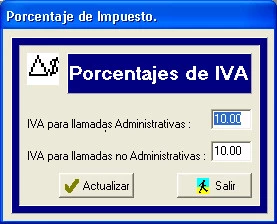
This option will allow us to program the percentage of tax (VAT) to be charged per call, we can do it for the administrative and for the other types of pricing, to enter this option click on the icon  VAT Percentage and the system will show the following window.
Simply click on the tax window you wish to change and then click on the Update  icon to save the changes or the Exit
  icon to return to the main menu.
Folio Numbering
To enter this module click on the Folio Numbering
Special Rates
This module will allow us to program some special rates, such as Internet calls or tell the system if we are working with a single rate or have discounts for schedules, as well as enter the value of the Metered Service. To enter this module, click on the Special Rates icon and the system will display the following window.
Fields:
Number of Minutes per block: Here we type the number of minutes we wish to charge per-block for Internet calls.Cost per-Block of Minutes: Type here the cost per-block of minutes for Internet calls.
Hourly Rate: If selected, the system will make discounts according to the time of the call, this is only for reports, in no way the nightly discounts are passed on to the Guest.
Metered Service: Enter the cost that your telephone company charges per connection (Metered Service).
Finally, if the rates charged by the telephone company to the hotel are discounted according to the time you call, click on the box before the Long Distance is charged according to time, otherwise, if you have a single rate, leave this box blank. It is clarified that this discount is not taken to the Guests, it is only used for reporting purposes, so that the actual rate charged by the telephone company is included in the reports.
Once you have finished your programming click on
Print Selection
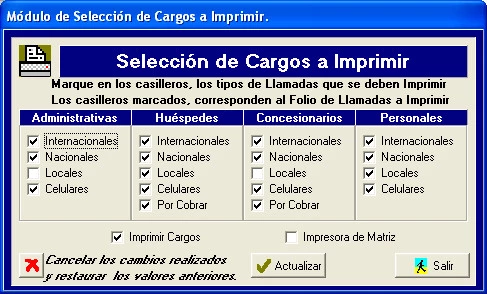
This module will allow us to select the type of calls we want to print, to do this simply enter the configuration menu and choose the Print Selection option or click on the  icon, and the system will display the following screen:
Simply click on each of the boxes corresponding to the type of call for which you want a charge to be printed. If you do not want to print a charge, the box before the type of call should remain blank.
If you do not wish to print any charges click on the Print Charges box so that the check mark is cleared.
If the printer you have connected to your PC is a matrix printer, click on the corresponding box so that it is selected.
Once the selection is made, click on the Update icon to save the changes or the Exit
  icon to return to the main screen.
Posting Selection
If you do not wish to print any charges click on the Print Charges box so that the check mark is cleared.
If the printer you have connected to your PC is a matrix printer, click on the corresponding box so that it is selected.
Once the selection is made, click on the Update
Posting Selection
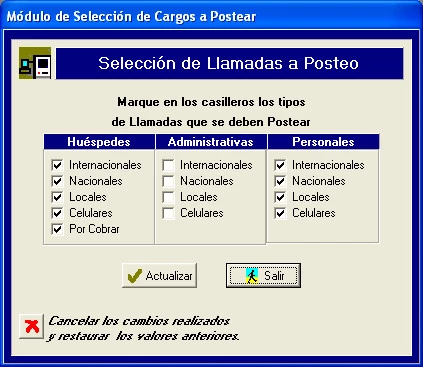
This module will allow us to select the type of calls we want to send to Posteo (send to your Front System), to do this simply enter the configuration menu and choose the option Posteo Selection, and the system will display the following screen:
It will be enough to click on each of the boxes corresponding to the type of call we want to be sent to the Front System to charge directly to the Guest's account or to the Personnel or Administrative Folio previously indicated. If a call type is not to be sent, the box before the call type should remain blank.
Once the selection is made, click the Update icon to save the changes or the Exit
  icon to return to the main screen
Backup Trajectory
This option allows us in the case of being connected to the network to perform an automatic backup of the call and data files to the network server.
This would serve as a backup and would also allow us to elaborate call reports without the need to go to the PC of the Tarificador to elaborate them.
When selecting this option, the system displays the following screen.
Once the selection is made, click the Update
Backup Trajectory
This would serve as a backup and would also allow us to elaborate call reports without the need to go to the PC of the Tarificador to elaborate them.
When selecting this option, the system displays the following screen.
Select the disk and subdirectory where you want the files to be stored.
Click on the Perform Backup box to tell the system what you want.
Once the selection is made, click the Update icon to save the changes or the Exit
  icon to return to the main screen.
Click on the Perform Backup box to tell the system what you want.
Once the selection is made, click the Update
PBX Alarm
This option allows you to program an alarm to warn you when you are not receiving records from your PBX, when you select this option, the system will present the screen to program the times.
We will be able to type the time in minutes indicating to the system that after that time if no other record has been received, the alarm will sound, we will also indicate the time between which the monitoring has to be done and finally we will be able to type a second time in minutes for the hours outside the previous schedule (night).
When the alarm is activated you will be able to turn off the sound by simply clicking the exit button.Utilities
Exchange Rate Update
When the alarm is activated you will be able to turn off the sound by simply clicking the exit button.
Utilities
Exchange Rate Update
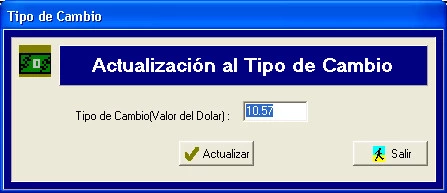
This option in our system allows us to have a dollar/weight ratio, which will be useful when we consult the cost of a call, the system will inform us in local currency and in dollars, to enter this option click on the  icon and the system will present the following window.
As you can see, it informs you which exchange rate you currently have and allows you to make the change if that is what you want, type it in and then click on  update to save the change or on the exit
  icon to return to the main menu without making any changes.
Guest Messaging Module
This module allows you to capture the necessary information to print a message left to a guest, to enter this option click on the icon  Message to Guests and the system will show the window to capture the corresponding data.
FIELDS:
Date: Here you select the date of the message, by default the System sets the date of the day of the message.
Room: Type the Guest's room number.
Time: Type the time of the message.
To: Type the name of the person to whom the message is addressed.
From: Type the name of the person who left the message.
Phone: Type the phone number of the person who left the message.
Message: Type the message left for the Guest.
Fill in each of the fields shown using the mouse or the Tabs key to advance in the fields, you have four lines to write the message left, once the fields are filled in select the icon to print the message, this will be printed in the same size with which you print your telephone charges, if you want to elaborate another message with the same text, just change the fields you want and print it, if you want to elaborate a completely different one, click on the Clear Fields
  icon and type the new information, to finish and return to the previous menu select the exit
  icon.
icon.Manual Positions
Room: Type the Guest's room number.
Time: Type the time of the message.
To: Type the name of the person to whom the message is addressed.
From: Type the name of the person who left the message.
Phone: Type the phone number of the person who left the message.
Message: Type the message left for the Guest.
Fill in each of the fields shown using the mouse or the Tabs key to advance in the fields, you have four lines to write the message left, once the fields are filled in select the icon
Manual Positions
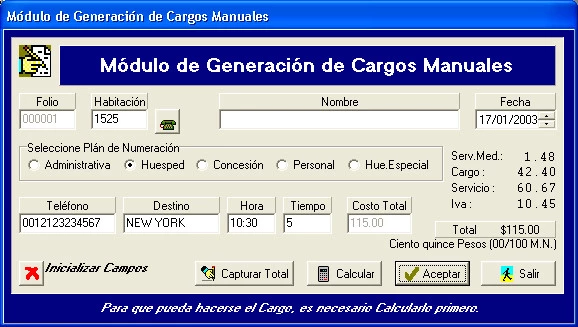
This module allows you to capture the necessary information to make a manual charge, that is, if for any reason you do not receive the information of the calls from your PBX or you want to make a charge for information, you can do it through this module, to do so click on the  icon and the system will show you the window to capture the corresponding data.
Fields:
Folio: Consecutive number of the call (the system assigns it).
Room: Number of the extension you wish to charge.
Date: Date of the charge.
Numbering Plan: Type of rate to be charged.
Phone: Number called.
Time: Time of the call.
Call Duration: Duration of the call.
Total Cost: Calculated cost of the call according to the type of call.
The first thing to type is the number of the extension to which you want to make the manual charge, by default the system will put the date of the day of the charge, if the date is another, select the desired one; then type the dialed number, as you dial it directly; then type the time of the call; continue with the duration in minutes, once you have filled in these fields, click on the Calculate icon, so that the system calculates the cost of the call and fills in the missing fields, the numbering plan will be automatically selected by the system according to how the extension is registered, if once the cost of the call is calculated you want it to be recalculated with the cost of another type, select it and then click on calculate and the new total will appear, if all the data is already correct, select accept so that the charge is sent to the Front System (if applicable), printed and stored in your disk for report generation.
If the total that the system gives you, does not correspond to your desire and you want to change it, select the Capture Total icon, so that the system allows you to type the total you want for this call, once typed click on accept, so that the charge is printed.
If you do not wish to make any manual charges, select the exit icon to return to the main screen of the Scheduler.
Call Routing
Room: Number of the extension you wish to charge.
Date: Date of the charge.
Numbering Plan: Type of rate to be charged.
Phone: Number called.
Time: Time of the call.
Call Duration: Duration of the call.
Total Cost: Calculated cost of the call according to the type of call.
The first thing to type is the number of the extension to which you want to make the manual charge, by default the system will put the date of the day of the charge, if the date is another, select the desired one; then type the dialed number, as you dial it directly; then type the time of the call; continue with the duration in minutes, once you have filled in these fields, click on the Calculate
If the total that the system gives you, does not correspond to your desire and you want to change it, select the Capture Total
If you do not wish to make any manual charges, select the exit
Call Routing
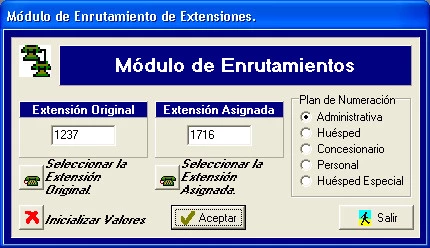
This module will allow you to transfer the call made from one extension to another, this module is very useful in case the guest is out of his room and wants to make a call and be charged to his room, it will also allow us to change the type of pricing when we want a call made from an administrative extension to be priced there but with a personal call cost, to enter this module click on the Routing icon and the system will show the following window.
Fields:
Original Extension: Extension that made the call (the one that hangs up last).
Assigned Extension: Extension where we want the call to be charged.
*For the case in which we only want to change the type of charging.
Numbering Plan: Select the desired numbering plan.
The first thing the system needs is the number of the extension where the call is being made, click on that field and type the number or click on the icon to consult the existing extensions, then type the number of the assigned extension, that is, the number of the extension where we want the call to be charged.
If you want to change the type of call charging, type the same extension number in both boxes and select the desired charging type by clicking on the corresponding box.
Once the extensions have been selected click on Accept to save the routing or
  Initialize values to clear the fields and type in new extensions or the exit
  icon to return to the main screen of the Tarifier.
This module can also be used so that a call made from an extension that is programmed to charge as administrative when hanging up is charged as personal, or with any other of the existing types, to do this type in Initial extension the number of the extension where the call is being made and in Assigned extension, the same extension number and select in Numbering plan, the type of charging you want.
Once the extensions have been selected click on Accept to save the routing or
  Initialize values to clear the fields and type in new extensions or the exit
  icon to return to the main screen.
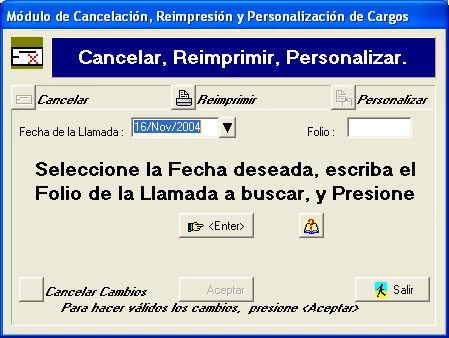
Call Canceling/Printing
 It also allows us to reprint any charge of which we wish to have a copy or charges that have been lost or that were not printed because the printer paper jammed, etc.
We can also customize the calls, i.e. if a call was priced as an administrative call and we want it to be a guest call.
Click on the icon to enter this option, you will see the following window:
Assigned Extension: Extension where we want the call to be charged.
*For the case in which we only want to change the type of charging.
Numbering Plan: Select the desired numbering plan.
The first thing the system needs is the number of the extension where the call is being made, click on that field and type the number or click on the icon to consult the existing extensions, then type the number of the assigned extension, that is, the number of the extension where we want the call to be charged.
If you want to change the type of call charging, type the same extension number in both boxes and select the desired charging type by clicking on the corresponding box.
Once the extensions have been selected click on Accept
This module can also be used so that a call made from an extension that is programmed to charge as administrative when hanging up is charged as personal, or with any other of the existing types, to do this type in Initial extension the number of the extension where the call is being made and in Assigned extension, the same extension number and select in Numbering plan, the type of charging you want.
Once the extensions have been selected click on Accept
Call Canceling/Printing
This module will allow us to cancel any call that for some reason we do not want to affect our totals.

NOTE: Canceling calls only means that the record is moved from where it was originally in your report to the canceled calls report. In no way does it mean deleting this call from the reports, much less from the archives.
We can also customize the calls, i.e. if a call was priced as an administrative call and we want it to be a guest call.
Click on the icon
Select the date the call was charged and its folio number, then select the icon  so that the system searches for it, if it finds it, it will display its data on the screen.
You will be able to add a comment indicating the reason for the cancellation, reprint or personalization of the call, this comment will appear in your reports.
Now click on the option that indicates what you want to do with the call, Cancel,
  Reprint,
  Customize.
If you select the Cancel option the system will indicate that it is a valid call and will ask you if you really want to cancel it, click on the answer that indicates your desire.
If you select Reprint, the system will simply reprint the call as it was originally printed.
If you select Customize, the system will show you a window with the different types of existing rates, double click on the one that fits your needs, the system will ask you to indicate if you want to recalculate the cost of the call according to the numbering plan you chose, once the question is answered, the call data will appear with the changes you indicated.
If you do not want to make any more changes with this call, select the Cancel Changes icon to delete the changes you have made;
  Accept to save the changes or Exit
  to return to the main screen.
Front End Connection / Host Interface
You will be able to add a comment indicating the reason for the cancellation, reprint or personalization of the call, this comment will appear in your reports.
Now click on the option that indicates what you want to do with the call,
If you select the Cancel option the system will indicate that it is a valid call and will ask you if you really want to cancel it, click on the answer that indicates your desire.
If you select Reprint, the system will simply reprint the call as it was originally printed.
If you select Customize, the system will show you a window with the different types of existing rates, double click on the one that fits your needs, the system will ask you to indicate if you want to recalculate the cost of the call according to the numbering plan you chose, once the question is answered, the call data will appear with the changes you indicated.
If you do not want to make any more changes with this call, select the
Front End Connection / Host Interface
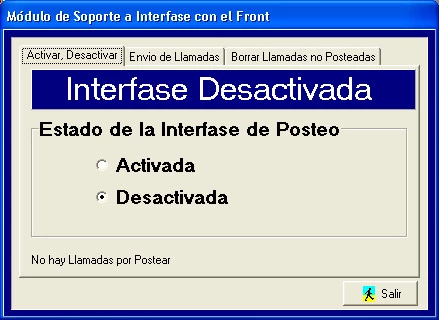
This module allows us to activate or deactivate the sending of calls to the Front System of the hotel, we can also send the calls that in a first occasion have not been loaded or we can also delete the pending calls to post, to enter the option click on the icon  Interface to Host and the system will show the following window.
As previously mentioned, this module has three options, to enter them select the tab that is according to your needs.
Activate, Deactivate, this option allows us to activate or deactivate the link with the Front System of the hotel, when deactivating it, all the calls that should be sent, will be stored in a file to send them later.
Sending calls, by selecting this tab, the system will show us all the calls that are pending to be posted, here we can send them to post or delete them according to our wishes, to do this just click on the box preceding the desired record and type a "P" if we want it to be sent to the Front or a "B" if we want to delete it.
If we want to send all the calls that appear on that page, click on the letter "P" highlighted in the window, to place in all calls the "P" or if we want to delete them click on the letter "B" and that letter will be placed in all records on that page, if you have more pages of calls do the same with each of them.
Once you have decided what to do with your calls, click on the Process icon, and the system will send or delete the pending records according to your choice, before doing so the system will ask you to confirm your choice indicating that the process will take a few minutes and that it cannot be interrupted.
If when sending the calls to the front-end system, it sends the acknowledgment that the call was posted, the call will disappear from our window, if not, it will continue in it and will only disappear until it manages to be posted or deleted by you.
File Backup
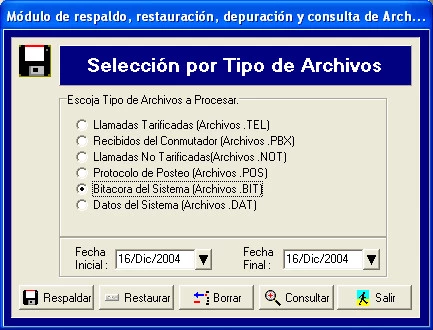
This module allows us to obtain a backup of the different files that compose the Tariff System, this backup can be done to any storage unit that is part of the configuration of your computer, Floppy Disk, Hard Disk, Zip Drive, etc.
To access this module click on the File Backup and Restore icon and the System will display the following window.
Activate, Deactivate, this option allows us to activate or deactivate the link with the Front System of the hotel, when deactivating it, all the calls that should be sent, will be stored in a file to send them later.
Sending calls, by selecting this tab, the system will show us all the calls that are pending to be posted, here we can send them to post or delete them according to our wishes, to do this just click on the box preceding the desired record and type a "P" if we want it to be sent to the Front or a "B" if we want to delete it.
If we want to send all the calls that appear on that page, click on the letter "P" highlighted in the window, to place in all calls the "P" or if we want to delete them click on the letter "B" and that letter will be placed in all records on that page, if you have more pages of calls do the same with each of them.
Once you have decided what to do with your calls, click on the Process
If when sending the calls to the front-end system, it sends the acknowledgment that the call was posted, the call will disappear from our window, if not, it will continue in it and will only disappear until it manages to be posted or deleted by you.
File Backup
This module allows us to obtain a backup of the different files that compose the Tariff System, this backup can be done to any storage unit that is part of the configuration of your computer, Floppy Disk, Hard Disk, Zip Drive, etc.
To access this module click on the File Backup and Restore
As you can see there are different types of files, here is a description of them.
TEL files: These files contain all the calls charged, its name is formed with the dates of the calls, MMDDAA.TEL where MM is the number of the month, DD the day the calls were charged and AA corresponds to the year.
PBX files:These files contain all the records sent by the PBX, this type of file is ASCII and can be edited with any text editor.
NOT files: The .NOT files contain records of calls that for some reason did not meet the rating requirements and were not rated.
POS files: These files contain the information about what happened with the postponement of calls, i.e. it contains the date and time when the calls were sent to postponement and the response received from the Front System.
BITE files: These files contain the information of who was signed in when you entered the different password-protected modules of the Tariff System, it also informs you if you made any changes in those modules.
.DATE files: These are the data files of the Tarificador, they contain the keys, rates, extensions, areas etc., it is recommended to backup them every 15 days, because these files are changing continuously.
Select the type of file you want to backup, once this is done for the .PBX, .TEL, .POS, .NOT and .BIT files, which are named with the date of the day they are created, select from when you want to backup or restore these files, finally click on the icon that selects the action you want to do with these files, Backup,
  Restore,
  Delete,
 Consult.
If you select Backup or Restore, the system will ask you to select the storage unit where you want to do your operation as well as the path of the operation, once selected click on the YES icons to continue with your operation or on the NO icon to cancel it and return to the previous menu.
If you select Delete files, the System, before doing so, will display a message for you to reconfirm your desire to delete the selected files.
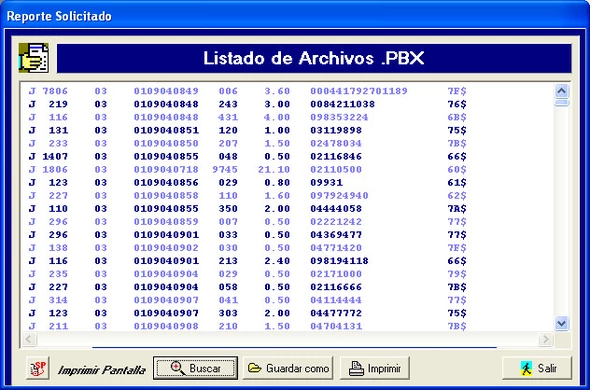
If you wish to consult the information contained in the .PBX, .BIT, .NOT, .POS or . TEL, you must select the period of time for which you want to consult your files, once selected click on the query icon and the records contained in your files will be displayed on the screen, if you want to search in our list some special information, just click on the search icon, and the System will show us a window where we must type the text that we want to find in the list, once typed, select search next, if the System finds the requested text, it will indicate you where it is, if you want the System to search if there is more information, press again the search next key, if the System does not find more information, it will indicate it to you.
TEL files: These files contain all the calls charged, its name is formed with the dates of the calls, MMDDAA.TEL where MM is the number of the month, DD the day the calls were charged and AA corresponds to the year.
PBX files:These files contain all the records sent by the PBX, this type of file is ASCII and can be edited with any text editor.
NOT files: The .NOT files contain records of calls that for some reason did not meet the rating requirements and were not rated.
POS files: These files contain the information about what happened with the postponement of calls, i.e. it contains the date and time when the calls were sent to postponement and the response received from the Front System.
BITE files: These files contain the information of who was signed in when you entered the different password-protected modules of the Tariff System, it also informs you if you made any changes in those modules.
.DATE files: These are the data files of the Tarificador, they contain the keys, rates, extensions, areas etc., it is recommended to backup them every 15 days, because these files are changing continuously.
Select the type of file you want to backup, once this is done for the .PBX, .TEL, .POS, .NOT and .BIT files, which are named with the date of the day they are created, select from when you want to backup or restore these files, finally click on the icon that selects the action you want to do with these files,
If you select Backup or Restore, the system will ask you to select the storage unit where you want to do your operation as well as the path of the operation, once selected click on the YES icons to continue with your operation or on the NO icon to cancel it and return to the previous menu.
If you select Delete files, the System, before doing so, will display a message for you to reconfirm your desire to delete the selected files.
If you wish to consult the information contained in the .PBX, .BIT, .NOT, .POS or . TEL, you must select the period of time for which you want to consult your files, once selected click on the query icon and the records contained in your files will be displayed on the screen, if you want to search in our list some special information, just click on the search icon, and the System will show us a window where we must type the text that we want to find in the list, once typed, select search next, if the System finds the requested text, it will indicate you where it is, if you want the System to search if there is more information, press again the search next key, if the System does not find more information, it will indicate it to you.
We can also send our list to a file or send it to print, to do this select the icon that corresponds to your requirement.
If you selected send to file, the system will open a window for you to indicate the name you want to give to the list and the place where you want it to be saved.
Once you have saved your listing, click on the exit icon to return to the previous window.
If you want to print the file, just click on the print icon and have your printer ready, the file will be sent immediately to print.
If you selected send to file, the system will open a window for you to indicate the name you want to give to the list and the place where you want it to be saved.
Once you have saved your listing, click on the exit
If you want to print the file, just click on the print icon and have your printer ready, the file will be sent immediately to print.
Consult
Extensions Consultation
This module will allow you to make a query to the extensions database, this query can be made by extension number, by extension name or by the name of the assigned area, to access this module click on the Extensions Query icon and the system will display the following window.
Select the tab that indicates how you want to make your query, if it is by extension type the extension number, and then click on the Enter icon, you can type the whole number or a part of it and the system will show you all the extension numbers that match the digits typed.
If you want to query by extension name, click on the name tab and then type the name or part of the extension name and then click on the Enter  icon.
icon.
Finally if you want to query by Area or cost center, click on the Area tab and type in the area number you want or select it from the right hand Area Listing window and then click on the Enter  icon or double click on the area number and then the extensions assigned to this area number will appear.
Consultation of Codes and Costs
This module will allow you to make a query to the Long Distance Codes database and its respective cost, this query can be made by Long Distance code or by assigned city, to access this module click on the icon  Query Codes, Costs and Destinations and the system will display the following window.
Select the tab that indicates how you want to make your query, if it is by L.D. Key, type the number of the key you want to consult do not forget to type it completely, that is to say for National Keys type 01 before the access key, if it is to USA and Canada type 001, if to the rest of the world type 00, in the case of cellular numbers type 044, and then click on the Enter icon, the System will show you (if it finds it) the assigned City as well as the cost broken down of the same one, by default it will give you the cost for guest, but if you want it to give you the administrative cost or any other, click on the circle before the plan to evaluate, you can also select how many minutes you want it to give you the cost of that call to that particular key, select it in the minutes window. You can also make your query by the name of the assigned city, click on the City Query tab and then type the name or part of the name of the desired city and then click on the Enter
 icon.
icon.
The system will show you the city or cities that match the name or part of the name you have typed, as well as the costs per minute charged depending on the Plan to evaluate that is selected in the respective window, remember that you can change at any time the Plan to Evaluate and the system will recalculate the costs again.
Telephone Directory Inquiries and Special Numbers
This module will allow to make a query to the telephone directory database as well as special numbers registered in this database, this query can be made by Destination or by telephone number, to access this module click on the icon  Directory Query and special numbers and the system will show the following window.
Select the tab that indicates how you want to make your query, if it is by Destination type the name of the supplier or customer with which you registered in your Phone Book, you can type the full name or a part of it and then click on the Enter icon, the system will show (if found) the number or numbers that match the name typed.
You can also do your query by phone number, click on the Phone Number Query tab and then type the number or part of it and then click on the Enter icon.
icon.
The system will show you the names of the matching suppliers or customers.
You can also do your query by phone number, click on the Phone Number Query tab and then type the number or part of it and then click on the Enter
The system will show you the names of the matching suppliers or customers.
Pending Routing Query
This module will allow us to see on the screen if we have any routing pending to be done.
If there is any, the system displays the following window.
As we can see in the window, there is a routing and the system shows us the extension number that originated the call and the extension number where the call should be sent.
To return to the main menu just click on the exit icon to return to the previous window.
Reports
Call Rate Reports
To return to the main menu just click on the exit icon
Reports
This module will allow us to obtain the different Reports that the Rate System has, click on the Reports icon and select the desired type of report, Report of Calls Rate, Non-Rate Calls, Incoming Calls or Internal Calls
Call Rate Reports
For Call Rates the system displays the following screen:
This screen will allow us first of all to select the type of report we want, to do this click on select type of report and choose the desired, then select the period of time for which we want to obtain the report, then select by clicking on the corresponding box the type of calls you want to appear, choose the telephone company that gives you service, choose if you want to break down the metered service and the service charged by the hotel or want a report without breaking it down.
Finally select if you want to add conditions to your report, click on the corresponding icon and select the field for which you want a condition and the system will take you to the screen for that condition.
For example if we want a report for a special dialed number, we select the Condition by Dialed Number field and a box will appear on our screen that will allow us to indicate which dialed number we want our report for.
Once you have typed in the number click on the icon  to return, if you wish to add another condition repeat the above steps.
Once you have finished selecting all the options click on the Accept icon and the system will proceed to display your report on the screen.
If we want to search in our Report some special information, just click on the search icon, and the System will show us a window where we must type the text we want to find in the Report, once typed, select search next, if the System finds the requested text, it will indicate where it is, if you want the System to search if there is more information, press again the search next key, if the System does not find more information, it will indicate it to you.
We can also send our list to a file or send it to print, to do this select the icon that corresponds to your requirement.
If you selected send to file, the system will open a window for you to indicate the name you want to give to the list and the place where you want it to be saved.
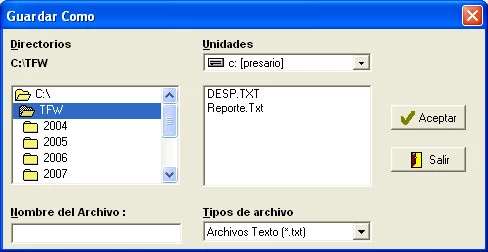
Once you have finished selecting all the options click on the Accept
If we want to search in our Report some special information, just click on the search icon, and the System will show us a window where we must type the text we want to find in the Report, once typed, select search next, if the System finds the requested text, it will indicate where it is, if you want the System to search if there is more information, press again the search next key, if the System does not find more information, it will indicate it to you.
We can also send our list to a file or send it to print, to do this select the icon that corresponds to your requirement.
If you selected send to file, the system will open a window for you to indicate the name you want to give to the list and the place where you want it to be saved.
Once you have saved your listing, click on the exit icon  to return to the previous window.
As you can see, the system asks us to type the period of time for which we want our report, once chosen click on the accept button to get your report.
As you can see in the comment column the system indicates the reason why the call was not charged.
As in all the cases of the reports you can print that screen, look for some special information, you can save your report as a file in any part of your computer or you can send it to print, just click on the corresponding button.
To exit click on the Exit button.
As in all the cases of the reports you can print that screen, look for some special information, you can save your report as a file in any part of your computer or you can send it to print, just click on the corresponding button.
To exit click on the Exit button.
Exit the System
To exit the Tartel System you must have logged in with an administrator password, otherwise this option will remain dark and you will not have access.
If the system displays an administrator login, click on the exit icon and the system will close the Tartel window.
If the system displays an administrator login, click on the exit icon
Related Articles
Requirements for Tartel Novohit Tartel Tarifier
Requirements for Configuring the Interface between the Call Switch and Tartel Via Ticket, send Novohit the following information which can be obtained from your PBX equipment provider. Switcher's Mark A plain text file (.txt) with the communication ...Symbology Tartel Interface
Name Icon Image Icon System Observations Access to Posteoip Posteoip On the desktop or initial screen of the computer. Access to Tartel Tarificador Tartel® On the desktop or initial screen of the computer. Conditions Tartel® At the bottom of the ...Tartel Call Center Configuration Manuals - Novohit
Complete Manual: Tartel Call Planner In Case of Failure In case of failure to post: Call Charger is not Posting - Activate Tartel Call Accounting Interface with NovohitCall Charger is not Posting - Activate Tartel Call Accounting Interface with Novohit
When the charging interface is not functioning, your system consultant or system manager should disconnect and reconnect according to the following procedures: Step 1: Disconnect the Interfaces Novohit → then Tartel: Deactivate the interface in ...Issuing Call Reports in Tartel Tarifier
To issue reports it is necessary to be at the computer where the Tartel® Scheduler is installed; in remote cases, a Team Viewer session can be used (the ID and Password of the computer where you are located are required). 1.- Enter Tartel® Tarifier ...