Front Office Credit and Debit Notes (PMS) - DTE Chile

This documentation is exclusively for companies that operate with Chilean Legislation and Electronic Invoicing.
Through this application you can perform different actions on the Electronic Tax Documents (DTE) already issued in the Front Office module, for this, you must go to: Front Office → Reception Cashier → Reprint of Invoice
The actions that can be performed are:
- Search Accounts and/or Documents (DTE)
- Register of DTE's
- Reprint of DTE's
- Assign or Annul of Credit/Debit Notes.
Any of the actions you wish to perform, must be for the same day or previous days, giving the option of being the same RUT or invoicing to a new RUT.
Search Accounts and/or Documents
To perform a search for an account or DTE document, you must follow the steps below:
Go to: Front Office → Reception Cashier → Reprint of Invoice. You will see the following screen:
Enter the information in the following fields:
Field | Description |
Guest Last Name | Last name of the registered guest. |
Elec. Invoice Folio | Invoice number initially issued. |
Invoiced to | Name of the company or natural person to whom the document was invoiced. |
Register Tax Invoice | RUT Number or Fiscal Code of Agency/Company. |
Invoice Date | Date on which the document was produced |
Click on the Search button.
The search will be performed with the information entered (these fields are not mandatory, so they can be all or some of them) and the information will be displayed in the Issued Accounts window.
Register of DTE
The registration of Electronic Tax Documents in the Front Office is done in the following applications:
DTE | Check Out | Reprint of Invoice |
Electronic Invoice | Yes | Yes |
Electronic Boleta | Yes | Yes |
Electronic Credit Note | No | Yes |
Electronic Debit Note | No | Yes |
Go to Front Office → Cashier Reception → Reprint of Invoice
Click on the Pencil icon of the account to which the invoice or boleta is to be issued in the Issued Accounts window.
In the Account Detail window enter the following items:
Field | Description |
Invoice Information | If the customer is already registered the name will be displayed by clicking on it to accept. Choose one of the following buttons if:
|
Industry | Select the appropriate one by clicking on it. Each industry has the corresponding tax documents. |
Document Type | Click on the type of document to be made:
|
No. Tax References | Clicking on the External References button displays the External References window where you enter the information required by the customer, which will be displayed in the DTE. The information will be entered in the Assign External References for Electronic Documents window in the following fields:
In the Assign External References for Electronic Documents window, the already registered references will be displayed. |
Print Type | Choose by clicking on:
|
Email to Send | Enter the e-mail address to which the files will be sent. |
Notes | Comments regarding the account are recorded. |
Click on the Generate Electronic Invoice button.
A window will be displayed to confirm printing with the message "Do you want to generate the New Document?"
Click on the Accept button to finish printing, displaying the DTE in its graphical representation in PDF format.
Reprint of DTE
To reprint a DTE associated with an account, follow the steps below:
Go to Front Office → Reception Cashier → Reprint of Invoice
Select the document date with the Calendar icon in the Filter By window in the Invoice Date field. The default option is today's date.
In the Issued Accounts window click on the Pencil icon of the account for which you want to perform the document consultation according to the requirement, download the appropriate file:
Credit / Debit Notes
Annul Electronic Tax Document
Assign Debit or Credit Notes to DTE
Click on the Pencil icon of the account to which the invoice or boleta is to be made in the Issued Accounts window.
In the Account Detail window, enter the following fields:
Click on the Generate Electronic Invoice button.
A window will be displayed to confirm the printout with the message "Do you want to Generate the New Document?"
Click the Accept button to finalize the printout, displaying the DTE in its graphical representation in PDF format.
PDF File: It will display the document in its graphical representation in PDF format which can be sent to print or save.
XML File: It will show the window or options for downloading the document in XML format.
Credit / Debit Notes
Annul Electronic Tax Document
In order to annul the DTEs, a:
Document Issued | Document to Override |
Electronic Invoice | Electronic Credit Note |
Electronic Boleta | Electronic Credit Note |
Credit Note | Debit Note |
Debit Note | Credit Note |
The actions that can be performed on both Credit and Debit Notes are:
Action | Description |
Cancel | It leaves the DTE without effect. |
Correct Text | Modifies text: Industry, Address, Company Name, Notes. |
Corrects Amount | Edit Amounts |
Assign Debit or Credit Notes to DTE
To assign a Credit or Debit Note to the issued DTE, perform the following actions:
Go to: Front Office → Reception Cashier → Reprint of Invoice
Select the document date with the Calendar icon in the Filter By window in the Invoice Date field. The default option is today's date.Click on the Pencil icon of the account to which the invoice or boleta is to be made in the Issued Accounts window.
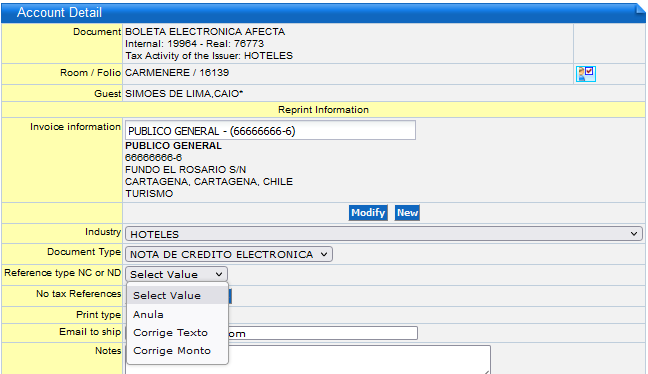
In the Account Detail window, enter the following fields:
Field | Description |
Invoice Information | If the customer is correct, it should be left unchanged. If you need to correct, choose one of the following buttons:
|
Document Type | Click on the type of document to be made:
|
Reference Type for CN or DN | Select the Action:
|
No. Tax References | When clicking on the External References button in case you need to modify or enter, the Assign External References for Electronic Documents window will be displayed where you enter the information required by the client that will be displayed in the DTE. The information will be entered in the Assign External References for Electronic Documents window for the following fields:
In the Assigned External References window, the references already registered will be displayed. Click on the icon to modify the data entered. |
Print Type | Choose by clicking on:
|
Email | Enter the e-mail address to which the files will be sent. |
Notes | Comments regarding the account are recorded. |
A window will be displayed to confirm the printout with the message "Do you want to Generate the New Document?"
Click the Accept button to finalize the printout, displaying the DTE in its graphical representation in PDF format.
Related Articles
Reprint of Invoices
In this application you can perform the following actions to issue invoices on the current day or on past dates: Consult or Print: Account Statement, PDF File, XML File. Reprint Information: When reprinting an invoice you can modify its invoice ...Credit Note with CFDi in Front Office - Mexico - Reprint of Invoice
To issue a Credit Notes to the CFDI to correct amount or cancel in Front perform the following steps: Go to Reprint of Invoices and search for the applicable Room or Folio. It is suggested to search by "Invoice Date". In the Issued Accounts window, ...Credit Notes Modifies Amount of the DTE
To issue Credit Notes to modify the amount of the DTE in Front perform the following steps: Go to: Front Office → Reception Cashier → Reprint of Invoice To perform the search for the Room or Folio of Various of the invoice that the Credit Note will ...Search for a Tax Document issued from Front Office
To search for a DTE issued in Front Office, the following actions are performed: Enter in Reprint of Invoice: Front Office → Reception Cashier → Reprint of Invoice Perform a search in the Filter by section by placing information in the fields: CFD ...Dispatch Guides (DTE 52) in Front Office - CL
Dispatch Guide can only be issued in the Reprint of Invoices option of the Front Office or POS. To know the types of Dispatch Guides, you can see the List of DTE Issued from Novohit found in the Glossary. To issue a Dispatch Guide from the Front ...